Thunderbird: How to add e-Mail account with POP protocal
This is the way to add e-Mail account into Thunderbird. Currently, I'm using Thunderbird 3.1.5 to demonstrate.
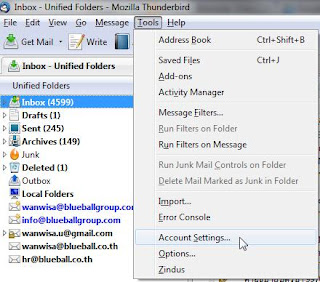
- From the menu bar, select "Tools" and then "Account Settings...".

- At the "Account Settings" window, there is a "Account Actions" dropdown list at the bottom left, click and select "Add Mail Account...".
- At "Mail Account Setup" window, enter
1) "Your name" = Your name
2) "Email address" = Full e-Mail account
3) "Password" = Your password
4) Check at "Remember password" to let Thunderbird remember it.
Then, click "Continue" button to continue.
- Thunderbird will try to find common e-Mail server name for you. But this case it found IMAP protocal. Click "Edit" to change to POP.
- Change the values
1) "User name" = Full e-Mail address
2) "Incoming" = POP server name
3) Change dropdown list to "POP"
4) Click "Manual Setup..." button
- It will close the pop-up window and return to "Account Settings" window. Click "OK" to continue work with your POP e-Mail account.
- From the menu bar, select "Tools" and then "Account Settings...".

- At the "Account Settings" window, there is a "Account Actions" dropdown list at the bottom left, click and select "Add Mail Account...".
- At "Mail Account Setup" window, enter
1) "Your name" = Your name
2) "Email address" = Full e-Mail account
3) "Password" = Your password
4) Check at "Remember password" to let Thunderbird remember it.
Then, click "Continue" button to continue.
- Thunderbird will try to find common e-Mail server name for you. But this case it found IMAP protocal. Click "Edit" to change to POP.
- Change the values
1) "User name" = Full e-Mail address
2) "Incoming" = POP server name
3) Change dropdown list to "POP"
4) Click "Manual Setup..." button
- It will close the pop-up window and return to "Account Settings" window. Click "OK" to continue work with your POP e-Mail account.


Comments
Post a Comment